6 Easy Steps to Outline Images In Cricut Design Space
Get a handle on outlining images with your Cricut with this detailed guide! I take you through each step, showing you the easiest way to create beautiful projects with your machine.
Outlining images with your Cricut is a great way to create custom projects that have the perfect professional touch.
With this step-by-step tutorial, you’ll quickly learn how to outline an svg file or another type of cut file in Cricut Design Space so you can get started on your unique projects right away.


Upload an Image and Prepare the Upload Process
To get started outlining images in Cricut Design Space, the first step is uploading an image file. This can be an original image that you made or one from the Cricut library.
You can find a variety of free and paid svg designs and Cricut fonts to use through Cricut Access, or you can upload an image of your own.

There are a few different ways to upload a file. A simple way is to open Cricut Design Space, click on upload image, and choose the one you want.
Next, you’ll prepare it for outlining by resizing it as needed and making any desired color changes.


I get commissions for purchases made through some of the links in this post. There is no extra cost to you. See my full disclosure here.
Different Methods
Up until this part, both the old and new methods are the same. Now things start to get a little different. I’ll go over the old method first and then cover the new method which is in beta at the time of writing this post.
Old Method
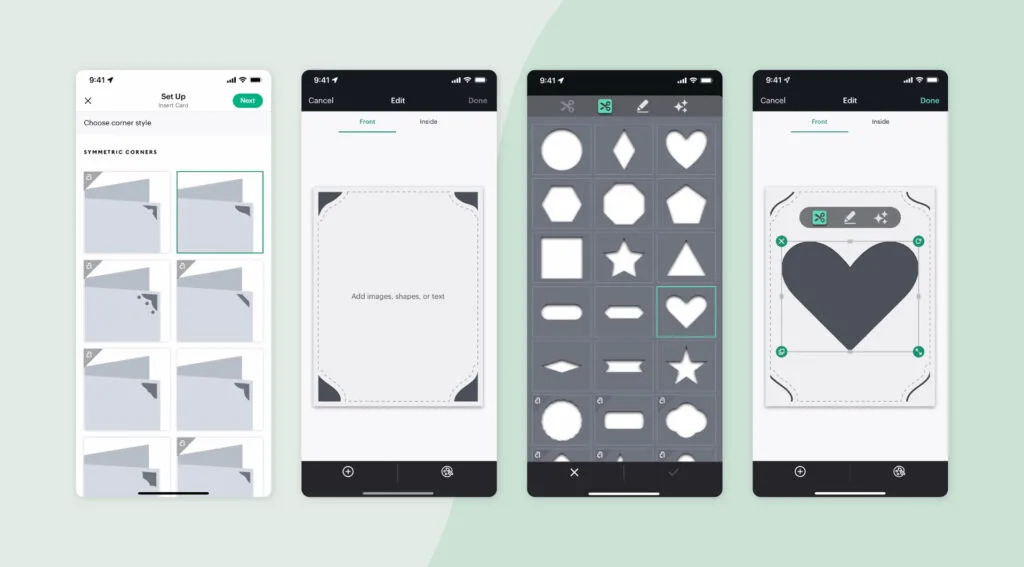
Set Up an Outline of the Image
Once you have your uploaded image and prepared it, it’s time to set up the outline.
The first thing you need to do is select “Inset” from the Select button in the top right corner of the workspace.
This will bring up a menu where you can adjust the width and height of your outline. After choosing your desired parameters, click “Done” to create a simple outline around your image file.
New Method
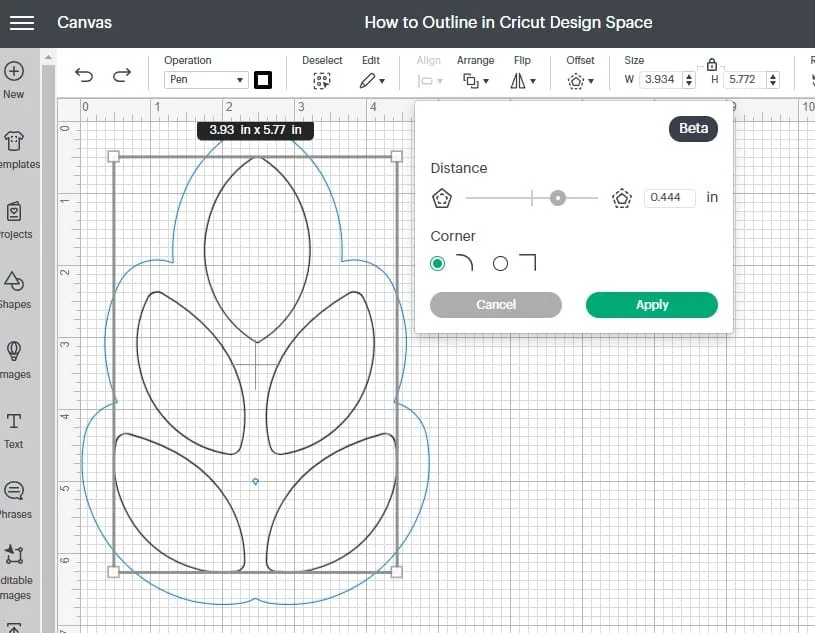
The Offset Button to the Rescue
The new method involves the Offset tool. Cricut users will love the new offset feature. If you’re reading this post later, then this great feature has probably moved out of beta and is part of the standard tool menus on the design space canvas.
So, once you’ve uploaded your new project, click on the design to select it. Be sure to look at the type of operation it relates to. The design may default to a cut, draw or print then cut image type.
Select your uploaded design and click the Offset button.
Now all that’s left to do is to adjust the distance and then click apply.
Those are the simple steps to outline your image. You can add additional layers using either method before you move on to the coloring step which is optional.

How to Outline Images in Cricut Design Space

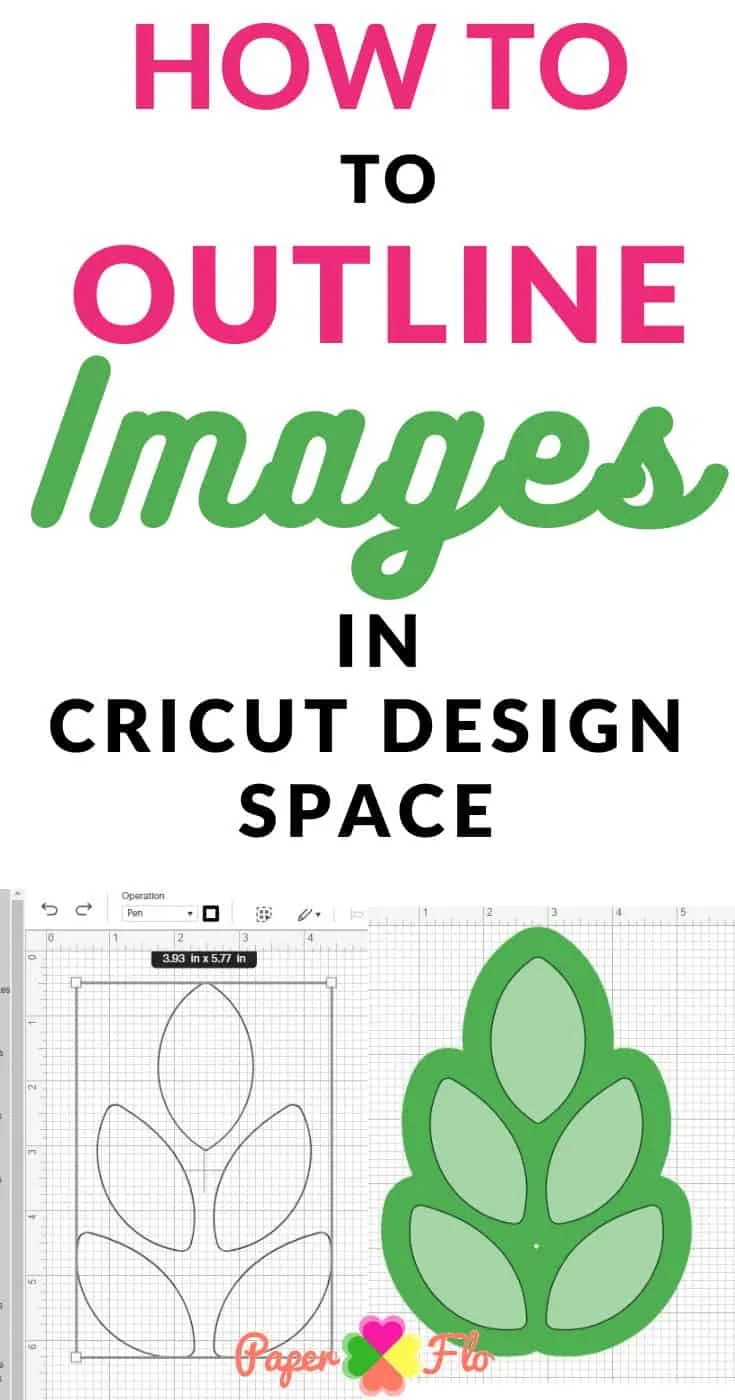
Use this guide to quickly outline a cut file or another type of cut file in Cricut Design Space. It will help you customize your projects right away.
Materials
- Design Space
- Cricut Access
Tools
Instructions
- Click on the offset button
- Scroll right or left on the measurement bar, or type in the number to choose the thickness and size of the offset
- Choose whether you want round or square corners
- Click Apply
- The offset result will show up on the following screen
- Two layers will now be in the layers panel
Notes
Check the operation type once you upload the image.
Recommended Products
As an Amazon Associate and member of other affiliate programs, I earn from qualifying purchases.
Select the Outlined Layer and Change It’s Color
Now that you have your outline, the next step is to give it a little bit of a splash of color! You can swap out any single color. Simply select the outlined layer of your original design and choose any color from the swatches palette.
This will add a colorful frame around the first layer of the outline of a shape.
If you can’t see the bottom layers, then you may need to change the operation type again just to see the changes. You can always change them back once you’re sure that you have the colors and layers that you want.
You can also adjust the thickness of your outline in the same menu where you selected Inset from earlier.


Group All Images Together For Cutting/Writing
Now that you have your outlined layer, it’s time to group all of the images you need together. From the left toolbar select ‘Layers’ and find ‘Group’. To finish selecting the individual layers press the ‘Group’ button in the right toolbar at the top of Design Space. Voila! Ready for cutting & writing!
Combine the New Shapes & Lines
Once all your images are in the right place and you’re happy with the design, it’s time to combine the pieces! Go back to your Layers panel and select “Attach” from the left-hand toolbar.
This will connect any cut lines so that anything that needs engraving or cutting happens with one pass of your Cricut machine.
Remember to Attach before sending and check that everything is ok by using the preview cut image tool. Another option is to merge the layers in the design step.
Need more Cricut Craft Help?
Cricut is a great crafting tool that is easy to use but once in a while, you may get stuck. If you do, check out my post on connecting Cricut to your computer or my shortcuts to fill in fonts in Cricut Design Space.


FAQ – 6 Easy Steps to Outline Images In Cricut Design Space
1. What is Cricut Design Space?
Cricut Design Space is a software program used with Cricut cutting machines. It allows you to create, customize, and cut various designs and images for a wide range of DIY projects.
2. How do I outline images in Cricut Design Space?
To outline images in Cricut Design Space, you can follow the six easy steps outlined in the blog post. These steps include opening your image, ungrouping it, creating a shadow layer, and more. Refer to the post for a detailed guide.
3. What file formats are compatible with Cricut Design Space?
Cricut Design Space is compatible with a variety of file formats, including SVG, DXF, PNG, JPEG, GIF, and BMP. SVG is a preferred format for vector images.
4. Can I outline both text and images in Cricut Design Space?
Yes, you can outline both text and images in Cricut Design Space. The process may vary slightly, but the blog post provides instructions for outlining both text and images effectively.
5. Are there any specific design tools or accessories required for outlining images?
While outlining images in Cricut Design Space, you will primarily need your computer, the Cricut Design Space software, and your Cricut cutting machine. Depending on the project, you might also need specific materials like vinyl, cardstock, or transfer tape.
6. Can I use outlined images for projects like stickers or decals?
Yes, outlined images created in Cricut Design Space can be used for various projects, including stickers, decals, and other crafts. It’s a versatile technique that allows you to personalize and enhance your designs.
Vernell Harris
Saturday 28th of January 2023
Thank you for these timely instructions. I recently signed up for your classes but I have not found my free offer yet please help me find it thank you
Naa Ardua
Tuesday 31st of January 2023
You're welcome Vernell. I sent you an email to follow up about the free offer.