
Learning how to merge layers in Inkscape is easy once you know the steps. I’ll cover each easy step in this Inkscape tutorial.
Many users like to organize sections of their design into various layers.
Personally, I like having everything in one layer but I realize that this method is not for everyone.
You may be thinking about why you would even want to put every section of your design into one combined layer.
I’ll explain the reasoning behind this next.


File Formats That Use Layers
Inkscape is great for graphic design because it can be used with many different file formats.
For example, if you’re a crafter, you probably use graphic designs to make DIY projects.
You can use Inkscape to make your own design files. Since you’re going to use your design to make crafts, then you’ll wind up saving your design as an svg file.




Why are SVG Files Ideal?
SVG files are ideal for using across different platforms. This is because svg files are vector objects and are the easiest files to upload to most cutting machine programs.
The svg file format can be transformed without losing quality.
Other graphic formats like raster images are not so great when enlarged or shrunk.
A raster image can look highly pixelated and blurry when the image size is increased.
Svg files don’t get fuzzy-looking when blown up on a large scale. The acronym svg actually stands for scalable vector graphic.
Scalability is why most crafters choose to use svg files. The fact that you can scale the design while maintaining the original aspect of it is essential to getting a beautifully completed craft.
Using Layered Files with Cutting Machines
Having a clean and merged svg file is important when using a cutting machine software program like Cricut Design Space.
The software program accepts different file formats such as png, jpg, dxf and svg. Obviously, choosing a file that is easily uploaded with clear quality is the best choice.
Cricut Design Space is able to read each layer of any svg file that you make using Inkscape.
If Design Space is not picking up all of the layers, you may have hidden layers in your file.
I have added tips and tricks to find out if you have hidden layers further below in the post, but you can also watch the video below to see how to spot this.
Incompatible File Formats
Certain file formats don’t work with some cutting machines. The current format of Cricut Design Space isn’t compatible with eps files.
There may be other laser file programs that you can use them with. The best option is to check the instructions and guides before you purchase either the machine or new design files.
Most companies will provide this information on their websites. If you can’t easily locate it, try using the search function of the site.


Separate layers
First step, make sure that each similar group of your graphic design is already segmented into a separate layer.
You may think that each part is on a different layer only to find out that you have drawn them on one layer.
Verify that you have several layers by going into the layers dialog.
If you had intended on grouping your design elements from the active layer into different layers and you find out that they’re not, you can still fix it.


Select the paths that you want to be on the same layer, click the Layer menu tool, and select “Add Layer” to create a new layer.
Next, name the selected layer.
Once you have your paths separated into individual layers and each layer name is designated, you’re ready to merge them as needed.
Let’s talk about how to do this.
Steps to Merge Layers
Alright, you’ve confirmed that your single layer is actually multiple layers or at least divided into several layers on your canvas.
Open the layers dialog menu. You can do this in one of two ways.
- Go to the top tool menu. Select “Layers” and click on it to open the layers dialog menu.
- Using your keyboard, type the shortcut “Shift+Ctrl+L”. Hit shift, control and the L key in that order. This is a quick way to open the layers palette.
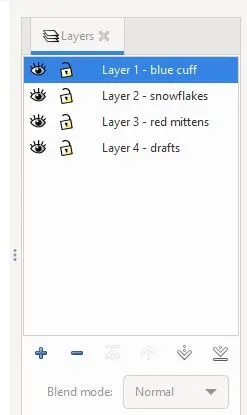
Either of the two methods above will open the Layers dialog menu as a new panel on the right side of your screen in Inkscape. You’ll see all of the layers in the panel.

Layers Panel
The layers panel is also another way to see if you have your design segmented into different layers.
Troubleshooting Tips
Here are some troubleshooting tips that can help in case you run into any issues.
Layer Status
Check the status of your layers. Is the layer hidden? Is it locked? Did you accidentally hide layer icons in your canvas?
There are two icons that control these two statuses.
- Eye Icon
The first icon is an eye. If the eye is open then every item on that layer is visible.
If the eye is closed, then that means that the items on that layer are not visible.
- Padlock Icon
The second icon is a padlock. If the padlock is closed then that means that the items on that layer cannot be moved.
Consequently, if the padlock is open, then the items on that layer can be moved and free to work with.


Layer Groups
The different layers are now ready to be merged. The easy way to do this doesn’t involve a path operation. Everything can be done within the layers panel.
Create a layer group by clicking and dragging one layer to the other layer that you want to merge it with.
For example, let’s say there are three layers and you want to merge layers one and two.
Click on the bottom object (layer two) and drag it to the top object (layer one). You’ll see a green border around the layer that you want to merge with.


Conclusion
Now you’ve gone through the easy steps, you know the essential things to merge layers in Inkscape.
Let me know if you found these instructions helpful.
